

How To Draw A Siberian Tiger
This drawing is the beginning cartoon that i have done at this size and it was a great learning experience from first to end.
This ane is a chip bigger, actually a lot bigger than my other ones. This drawing volition mensurate 30″x40″. Its going to be quite big and will allow me to add much more detail. Reference image by Art G.
Progress
Update 8/4/2009-

I decided to utilise a grid for this i to go the tiger correctly on the newspaper and not have to worry almost it non fitting. I accept done some work on the eye. I will be adding a bit more detail to the eye once i have both eyes washed. What yous're seeing in that update is just 2.v″x3.v″ of the whole drawing. Here is a shot of the whole paper and then you accept an idea of how big this cartoon will be. Information technology was as well big to fit on the scanner so i had to accept photographs. I'm still trying to figure out how i can get articulate pictures. With each update the quality of the pictures will ameliorate. Well i promise you enjoy this one and if you lot have whatsoever questions just leave a comment.
Update 8/7/2009-

The paper that im using is working beautifully for the texture that i'grand looking to become. Information technology works great with the pilus technique that i use. Its thick enough for the indentations to look great. I've been working on t his drawing for about a week and i have both optics about done. I don't say completely done because as i brainstorm to add more detail ill probably darken the right eye on your side. This side volition take more shadows than the other side. I'1000 taking my fourth dimension with the item specially the hair. I desire to take the right look and texture. The important matter with the hair technique is to be able to go the right effect of layering. Hair overlaps, and that is the event that i try to accomplish when cartoon hair. it gives the overall drawing much more depth. Being able to do this comes with understanding hair outset. You accept to know that hair overlaps before you lot can actually apply it in your drawings. Again, you lot can't draw what y'all don't know or accept never seen. With this drawing I'm constantly going dorsum and along looking at different reference photos, especially house cats. This lets me add fine details that volition add the right amount of realism. I'm not sticking to one reference photo. From hither on sick begin to add together the pilus under the right eye. Once i do this i will connect both eyes past adding the hair to the nose. I'm still getting used to the size of the cartoon. It'south my first time working on a cartoon this size, and so there are times that it gets a flake uncomfortable when cartoon. Well i gauge if at that place is no pain there is no gain :). Well hither is a shut up of the eye that im working on at the moment. Remember that volition not exist the final result as ill be adding subtle details as i move along.
Update 8/9/2009-

I accept started adding a bit more particular around the right eye. I'm condign more than and more than of a fan of this paper that im using. Its my first time using it and i find it that its working incredibly well with the amount of item that i want to add together. I accept added the indentations for the hair and im now pulling out the details. Im adding the shadows in between the hairs. Im also making the clumps of hairs using the kneaded eraser. Its a chip tricky with white hair because the shadows should be calorie-free enough to suggest a lighter pilus. I want to end the expanse around both of the eyes and will then go along with the rest of the face up. I do the eyes outset in nigh of my drawings because i utilize them for reference. I compare whatever im drawing to the eyes so information technology all fits together. This helps me keep the drawing equal when it comes to value and tones. Here is another close upward and then you tin encounter the detail a flake more than conspicuously. The detail is tedious, especially with the amount of hair that tigers have, simply its worth the time spent.
Update 8/10/2009-

The eyes are coming together. Y'all tin can begin to see the intensity that these animals have in their eyes. This is the reason i take my fourth dimension with the optics. If the there is no life in the optics, the drawing just doesn't communicate with the viewer. At the moment I'g working the hairs effectually the optics. I take effectually 20 hours on this drawing and this is what i have so far. The reason for this, is because of the corporeality of item that im calculation to the hair. I desire to make sure that the pilus looks like hair and that information technology keeps that crude look that tigers have. In one case i terminate the area around the eyes i will move on to the area betwixt both optics, which will join them. From the newest update epitome yous tin can the divergence betwixt both optics. The right side has much more particular than the left middle. Once i end adding the detail, both eyes volition have that same corporeality of detail. For this drawing i'thousand using 2h,6h,4b and hb pencils. I'chiliad also using the stylus,kneaded eraser and color shaper. These are the about common tools that i use in all my drawings. Here is a view that measures 8″x10″ and then y'all can run across the expanse that im working at the moment and how it compares to what i have all the same to encompass. Again, this drawing will mensurate 30″x40″, so its going to be quite a big drawing. I'm nevertheless debating whether to add Siberian forest as a background or just get out information technology with a white background.
Update eight/eleven/2009-

I'yard however working mostly on the left eye and i've been adding subtle details. These details are mostly small shadows which suggest the layers of hairs. You can see from the previous update how these subtle details make a difference. I besides added some long black hairs on the black patches. Most people when they draw this stripes on tigers, they make them await like bands. When i describe them i make them look like layers of hairs. These blackness hairs overlap the side by side layer of lighter hair. I'1000 not sure if you can come across these hairs, merely these details are what makes a cartoon so interesting to look at when they are consummate. Here is a shot from a bit farther away and then you lot can see how its coming together. It doesn't seem like huge update, but from the previous update to this i I've worked on it for three hours.
Update 8/14/2009-
The area around the eyes is nearly complete and im at present outlining the hair betwixt the eyes. This hair is a scrap longer than the hair on the nose. The hair on the nose is much shorter and effectively so i accept to make sure that they blend in nicely. I accept outlined the tips of the pilus as you can see from the update. This allows me to see where to add the shadows to bring out the illusion of hair. With practice i have been able to learn how to encounter the hair patterns, so i know where to add the shadows. It has taken me some time to go to this indicate just im really happy with the results so far. I want to brand to make sure that i add equally much item as possible, to get the most realistic look. I always tell people that its impossible to draw pilus, unless you are insane and desire to sit in that location drawing every little hair strand. My goal with my pencil drawings is to requite the illusion of pilus with pencil. Simply like photographs give the illusions of a scene using pixels i desire to do the same with pencil and the techniques that i apply. Next update the area that im working on at the moment will be complete. Again, as i move along i get back and adjust the detail in parts that i have already finished. I'm always comparing what im working on to what i have completed to either add or remove things from the drawing.
Update 8/18/2009-

I'thou starting to move my way downwards the nose and have connected the two eyes. The hair on the olfactory organ is much shorter, so i'thou making sure that the indentations are not long. I'm calculation the clumps of pilus using the kneaded eraser. This will give the hair much more texture and depth. You tin encounter from this image that its meeting. You can also see how large this drawing is going to be.
Update 8/27/2009-

I haven't been able to update because the camera that i had died on me. The batteries that i was using blew upward and ruined the camera and at present i can't employ it. I had to discover an alternative and ive used a spider web cam.
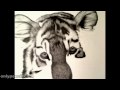
Now for the cartoon. As you lot tin can come across from this update i accept progressed quite a bit. I have added the hair on the nose and have added the hair on top of the hair. At the moment i'm working on the left ear and calculation the long hairs that come out from inside the ear. I'thousand using the stylus for these hairs and i accept to make sure that i make them in one unmarried motion. These hairs are long so i desire to get the right effect. On top of the ear, along the edge i nonetheless have to add single black hairs that will stick out from there. I'm adding subtle details every bit i go along, for example, im adding clumps of hairs equally i continue. Clumps of hairs are hairs that are so shut that they cast a single shadow. To become that effect all i do is use my kneaded eraser to erase and get that result. One time i terminate both ears i will brainstorm the area under the eyes and will move to the more than complicated part of the drawing, the whiskers. Why Complicated? Well, these whiskers will be floating on top of the hair below. Therefore, i accept to brand sure that i become the right effect so that the whiskers don't blend into the hairs below. Here is an image of the whole sheet of paper and then y'all tin encounter how much i accept covered then far. Over again, this drawing measures 30″x40″.
Update 8/30/2009-

Im still working on the left ear. I have the basic outline for the hairs and all im doing now is bringing out the details. Im adding the shadows that suggest that clumps of these long hairs are overlapping the hair below. Once i finish this i will matter black hairs that i will overlap the ear hairs. I even so accept to add together the hair forth the top of the ears. I will be spending quite some fourth dimension on this ear until i get the right result im going for. For the ear, all i have used is 4b and 6h pencils,kneaded eraser and stylus. One time i end this ear i will move on to the other side and will practice the same. This cartoon is progressing nicely, a bit tedious simply its coming together.
Update nine/10/2009-

Both ears seem to be finished, only i still have some fine details to add, to requite it a bit more than realism. What i accept done then far has been the same that i accept on previous sections. I'm not planning on how to become about cartoon the whiskers. This section volition be a bit challenging because the area under the whiskers will be hair from the cats body. I have to make sure that the the whiskers will non go lost within the detail below information technology. In other true cat cartoon i have offset indented out the pilus beneath first and then over that i indent the whiskers. The size of this drawing will brand that a scrap more challenging. I will make certain that the indented whiskers are much thicker than the hair below. I'thousand still thinking on how to go about doing that. At the moment im working on the left side and will stop that part off before moving to the other side. Once that's done i will finish the expanse on each side of the nose. Hither is a picture of the whole cartoon and so you lot can how information technology looks on the whole sheet. Here is a closeup of a section of the drawing. Y'all can come across the amount of detail that im adding. I don't want to rush information technology and take the fourth dimension necessary to become it to look similar i want. The progress is not as fast equally my other ones but its coming together nicely.
Update 9/sixteen/2009-
Here is a video i recorded of what i have so far. This way you can see how much detail im calculation to it. I have a long way to go but i don't want to rush it and what it to wait similar i have it pictured in my head. Im adding alot of details that i cannot come across in the reference photos. For example, im making the tips of the black hairs a bit longer. This volition give the drawing much more depth and it will accept more texture. Well if you have any questions, please contact me or go out a comment.
Click to Sentinel
Update 9/21/2009-

I've been working on this equally much equally possible. It doesn't look like progressing but but the corporeality of detail that im calculation i tin can tell you that each update is a major ane. What im keeping in listen with this drawing and all the tiger drawings that i exercise, is that the hair gets longer as you go to the edge of the face. I started working on the other side of the face up and added the bones outline of the stripes. I will go in and work work this expanse, bringing out the highlights and the clumps of hair that will give information technology much more than realism. Another thing that you lot may notice is the shaded area on the top left side. This cartoon was suppose to be just the tiger, but as i progressed i was contemplating on whether i should add a background or not. Well, i finally decided that a background will compliment the tiger nicely. What is the background going to exist? I decided to add a background of the Altai Mountains in Siberia. What you run across is the bones outline of the mountains and the top part is the sky. The mountains will also be visible on the right side of the tiger. There volition exist trees on the bottom part and a lake will also be visible. It will be more work merely im confident that it will only amend the whole drawing. If you don't know what the Altai Mountains look like, here is a pictures.

The background will be like a completely different drawing, but for now im going to focus on the tiger and volition move on to the groundwork once i finish the cub.
Update 9/23/2009-

Ive been putting in around 6 hours of drawing each 24-hour interval. Its progressing slow but im staring to see information technology come up together. Im working on the right side as y'all can see from this update. I mentioned earlier that the hair on the edge of the face is much longer than the hair on the centre of the face up. To get the effect of flowing finer pilus i will employ my knead erase to blur out the tips of the hair in this expanse. I volition exercise this once i take finished adding the residue of the details. I haven't done anything unlike from the last updates. The particular that im adding to the pilus is the main reason why its taking me so long to progress. I promise to finish it presently but i don't desire to blitz information technology. I want to dedicate the amount that it needs for it to expect similar i desire. You lot can also watch this sped up video of a 3 hour drawing session.

Click to Watch
Update 9/24/2009-

I'1000 now working on both eyes and will complete the area below them. The hair under the optics is much shorter to so i have to brand certain to make the indentations shorter. One time i complete these areas i will starting time outlining the whiskers. On my smaller drawings i usually make random indentations to make the whiskers. This drawing is much larger then i accept to brand sure that the indentations are polish and curve nicely. I will outline the whiskers first with a pencil lightly and then will indent the pilus that volition be beneath the whiskers. One time i finish that i will start indenting the whiskers making sure that those indentations are much thicker so they don't get lost with the lines below. Information technology always help to programme out alee of time so that it looks they way you lot desire it. The head is beginning to look much more solid as more than sections are added.
Update 9/28/2009-

I volition now outset to work on the area around the whiskers. This is the section that will be somewhat tricky. Every bit you can see i have outlined them with pencil. I will now brainstorm to indent the hair that volition be below the whiskers. Once that is done i volition indent the whiskers and make sure that they are much thicker. Afterwards indenting, i will begin to add the shadows to the hairs below and slowly the whiskers will become more than visible. This section will exist divided into iii layers. The whiskers, the hair beneath and then the shadows that the hair below will have. Y'all may also notice that i have outlined the rest of the tigers body. Its just rough outline and i will slowly add together detail as i movement forth. At the moment my main focus is on the face, i will not pay attention to the balance of the body until im washed with that part. I volition have my fourth dimension on the whiskers so i make sure that they are washed correctly.
Update ten/1/2009-

This is where i outset to become excited, when i begin to run across it come together. In my stance, the most of import office of whatever animal drawing are the eyes. Its the part of the drawing that communicates and makes contact with the viewer. With this drawing yous can feel the tiger looking at you, waiting patiently to be brought to life. The difference between an eye and an eye that has life is the subtle details that are put into it. I'm actually happy with the way the eyes turned out on this 1 because the tiger looks similar its staring correct at you lot.
I volition now first to piece of work on the area around the oral fissure. I have already indented the expanse on the left side and will then move to the right side. Once i take that i will begin to indent the individual whiskers. The reason i indent the hair below first and not the whiskers is because i would have to do double the work. I would have to indent the whiskers, and so indent the bottom pilus and by doing that i would go over the whiskers. Then, to bring out the whiskers again i would take re-indent them. Then, its much easier to indent them once i have done the area below. Once i accept washed all that i will begin to add the particular, which includes the shadows and highlights. Every bit i progress with this particular the whiskers volition begin to exist visible. There is quite a flake more than piece of work to be done on this drawing just i feel that im progressing quite nicely. I'g drawing about 5 hours each day and making certain that the amount of detail is equal in all parts of the drawing.
Update 10/7/2009-

Click to Enlarge
The area that I'm working on at the moment is divided into two sections. The first part are the whiskers and the second part is the area below the whiskers. I recollect when i first started cartoon big cats, i always had a problem with whiskers. I would outline each whisker and would describe the details that were suppose to exist behind them. I now use the stylus to brand things less complicated, just don't go me incorrect at that place is still piece of work involved. The best mode to tackle a drawing is to plan alee and come upwards with ideas. Exam these ideas on a separate sheet of newspaper and once you know what you want, transfer those ideas to the actual cartoon. Again the problem with whiskers is how to draw the detail backside them and it doesn't help that most of that detail happens to be more hair. The technique that i take used for a while at present has been to indent the expanse below and over that indent the whiskers. On this update y'all can see the whiskers that i have indented but before doing that i worked on the hair below information technology. Once i finished making the whiskers i picked upwards the pencil and started adding the detail below. Equally i progress the hair below the whiskers will slowly begin to reveal themselves. For the whiskers i had to make sure that the indentations were thicker than the hair beneath. This technique is a skillful way to add realism and depth to the drawing. I have non yet finished all the whiskers on that side. Once i end that side i will begin on the other. In that location is still so much more than work to do only I'm really happy with the way its turning out. Here is a shut upwards of the expanse that I'g working on at the moment. In one case i accept finished the detail below i will clean up the whiskers to fifty-fifty them out. I take darkened some of the whiskers because not all of them will be striking directly by light.
Update ten/nine/2009-
Hither is another 3 hour session. Im taking my time working on the whiskers and the area below it to become the right consequence that im looking for.

Click to Watch
Update ten/27/2009-

The face is nearly lxxx% complete. There are minor details that i volition add once i have the groundwork set up. For example the fine hairs effectually the edge of the face. By overlapping over the background they volition create some depth and realism. I will be darkening some sections every bit i proceed too until it looks like the way it want it to. I need to go along in mind that the correct side has more than shadow so this area needs to be a bit darker than the other side. I finished the oral cavity and mentum. I used the aforementioned technique that i explained in this tutorial. At the moment im indenting the area that is below the chin and will then motility on to the two front legs. I'm dedicating more than hours on this cartoon and i believe the hardest part of the drawing has been completed. The rest of the drawing will only accept time.
Update 11/12/2009-
Every bit you can encounter i have progressed quite a bit from the previous update. At them moment i'm working on the left paw, adding the detail. Im darkening past layers and adding the highlights as i become along. Using the kneaded eraser i create clumps of hairs. On the right side i have outlined the menses of hair that i will exist indenting. This is the part that takes the longes, its a big surface area so it will take time to add the right indentations. Once i have washed that i will begin to add the details like on the left side. Once i finis the ii legs i will move my way onto the body which will exist the last of the tiger. The video below shows the amount of detail that im adding to this cartoon.

Click to Watch
Update 11/25/2009-

The legs are almost complete and will and then motion on to the torso. At the moment im working on getting the correct texture for the pilus by following the contours of the legs. This will give the two legs much more depth and realism and they wont expect flat. This can be achieved by calculation shadows and highlights in the right areas. The body will be the terminal part for the tiger and will so move on to the groundwork. I desire to completely terminate or at least have most of it washed earlier starting the background because i will be using different techniques for each department. The background will accept water,some grass,trees and clouds. These will require me to use techniques that i have non used on the tiger. Click on the image below to scout a curt video of what take and then far.

Click to Scout
Update 12/1/2009-

Well the tiger seems to exist complete simply in that location are still things that i need to add once i complete the background. I demand to add the fine hairs around the edge of the body which will overlap over the groundwork. This will give the drawing much more depth and will also soften upwards the edges, specially around the head. I have started to outline the grass on the bottom right corner. Once i have outlined and filled in the empty infinite with pencil i will use an eraser to add finer grass blades. Once i practise that i will then fill in the detail for the grass blades that i accept now. Information technology might just exist grass but im really taking my time on it. I've been studying photographs with grass to get an idea of how to go about calculation the detail. I accept drawn grass before but its always a expert idea to refresh your memory looking at reference textile. Information technology will make things much easier and in the finish volition ever look much better. Once i finish that corner i volition motion on to the left side and will first on the mountains. I volition be working from the furthest point, the mountains, and will work my way towards the closest area. In one case i terminate the mountains i will add the trees that will exist in front of the mount. Again, this will add much more depth and texture. This is the bespeak where i get excited and i can begin to see how it volition look in the cease.
Update 12/fourteen/2009-
 /eye>
/eye>I take finished adding the grass on the bottom right corner and have outlined the grass on the bottom left corner. I have started working on the mountains. The mountains will exist covered in snow and then the challenge for that department volition exist to go that consequence. I want to brand sure that the snow is visible and the rocks are besides. Im using the negative drawing technique to bring out the snow. I started from the elevation and will movement my way downwardly until i reach the grass below. The mountains will be made up of three basic tones. Black,white and something in between those ii. The middle tone will be used for the shadows that will be cast by the mountain over the snow. The bottom section of mountain volition accept a fleck more snow. There will be some trees that will overlap the mount and volition give depth to the drawing.
Update 12/17/2009-
I can at present brainstorm to see the end for this drawing. I take only the mountains and lake to go and that will be it for this cartoon. I'm concentrating on the fine details on the mountains to get the right look of a mount. I don't want to rush information technology fifty-fifty though i'chiliad close to the stop. This is where people can fall into that trap of rushing the final bit of it. I just focus on the section im working on and endeavor not to think about the end.

Click to Scout
Conclusion

This was a long project and im and then happy to have finally reach the terminate of it. I'chiliad at present ready to motion on to the next ane. Like with all my drawings my focus is are the eyes. If i don't get them correct, the drawing lacks whatsoever emotion and life. With all my drawings, i strive to put in every bit much texture and possible and this one is no exception. This drawing is total of textures similar fur,rocks and grass. With all my drawings i learn something new and this whole drawing was a huge learning experience. Being my first large scale cartoon i have learned so much drawing in this size. I had to utilise all the techniques that i possess to complete this drawing and im happy i took the fourth dimension that it required. The most difficult part of the drawing was the last bit of information technology. Its e'er piece of cake to start slacking off at the end because y'all are close to the end and y'all just want to complete it. Rushing was non an pick, i wanted to become the right amount of item to get the right effect. Its hard to capeesh the amount of particular through photographs or videos. The all-time style to see this would exist in person to get the full effect.

Source: https://www.onlypencil.com/pencil-drawings/siberian-tiger-cub/
Posted by: lupientorty1994.blogspot.com
0 Response to "How To Draw A Siberian Tiger"
Post a Comment